Sanitize in less than 20 minutes!
Congrats on the new camper! With all the glorious travels ahead of you, you have lots to look forward to. Let’s take a quick look at cleaning RV holding tanks so you can master this step and move on to more enjoyable things!

Your RVs fresh water tank should be sanitized at the start of your travel season, and again mid way through. Black holding tanks are treated while you’re on the road, both grey (sink water) and black tanks (sewer solids) should be sanitized before storing at the end of travel season. Hang with me, it’s easier than it sounds...
Cleaning fresh water holding tanks
- Turn off heater & pump.
- Drain systems.
- Add bleach.
- Pump on, run faucets.
- Pump off, drain.
- Quick rinse.
- Replace filters if needed.
Sanitizing your RVs fresh water system once per year at the start of your travel season is always a great idea, cleaning it more often is even better. Water should not be left sitting in the tank longer than 2 weeks and always remember to drain your tank before storing your RV.

How to clean fresh water tank:
- If mid season: Turn off water pump and water heater. Don’t damage your pump by letting it run empty. It’s also a great idea to let the heater cool for a bit. Head outside to the heater panel and open the door. Open the pressure release valve and remove the drain plug. NEVER DRAIN A HOT OR PRESSURIZED WATER HEATER. Stop and think about that one for a second… ouch.
- Drain hot and cold water lines. Take a look under your rig, there should be two valves located at the lowest point of your water system. See two lines dangling? Open to drain them, close them when you are done. Draining on the street is fine as it is fresh water.
- For both mid season and beginning of the travel season: How many gallons is your system? For every 10 gallons add 1/4 cup bleach. Not sure? Opt for a cup of bleach for smaller travel campers and 1 1/2 cups bleach for larger RVs. Measure your bleach into a gallon of water to dilute it just a bit and pour into your fresh water tank, use a funnel if you need too. Top off your tank with water and rinse the area incase you spilled any. NEVER MIX BLEACH WITH OTHER CLEANING PRODUCTS. House cleaning rules 101.
- Turn water pump back on and run all faucets for a minute or two. (including outdoor faucets/showers) You want to run the bleach solution into all the lines, hot and cold. Running this water into your grey tank is great for cleaning it out too if you are prepared to dump it. If not, run faucets into a tub or jug you can dispose of down a drain at your house.
- With faucets off, agitate the tank if you can. Pull your RV forward and stop. Slosh. Back it back up and stop. Slosh. you get the idea. Take it for a drive around the block if you want. Allow the bleach solution to do it’s job for 5 to 10 minutes before draining and rinsing. Don’t let the bleach sit for much longer (like overnight) as it can start to warp seals and gaskets. You want the bleach to sanitize not etch it’s way into your pipes or leave a lingering odor. According to Beckershospitalreview.com the maximum time allowed for disinfectant contact time is 10 minutes.
- Turn the pump off and drain the tank once more. Yes, draining straight bleach onto your drive way would be rude, but a diluted solution such as this, the chlorine (bleach) dissipates/evaporates rather quickly. Be sure to give your driveway an extra rinse right afterward. Bear in mind folks water their lawns with chlorinated city water and add chlorine to swimming pools, we use it everyday. Also, a bleach solution if left out for 24 hours is no longer effective anyway, so be sure to mix only what you need. Sanitize your tank at at the nearest dump station if you prefer.
- Now for a quick rinse, no soaking time. Refill with water, pump on and run faucets, pumps off and drain again. Now you’ve rinsed the bleach from your system and are sparkling new.
- Replace any water filters that may need replacing.
You did it mama! You just slayed that fresh water system of yours. Now go fill ‘er back up with clean water and hit that open road!
Note: The CDC states “Leave solution on the surface for at least 1 minute” to disinfect when cleaning your home. They also state “Disinfecting kills germs on surfaces” while “sanitizing lowers the numbers of germs on surfaces or objects to a safe level”.
How to clean your RV hot water tank
Cleaning and sanitizing your hot water tank is done by cleaning your fresh water tank. As long as you are sure to run the bleach solution through your hot water lines as detailed above your hot water tank will be cleaned as well. Be sure to rinse the lines, running the hot water faucet until it no longer smells like bleach.
Cleaning black water holding tank
You’ll want to clean and sanitize your black water holding tank at the end of the season as you prepare to store your RV for the winter or you feel the need to deep clean your tank. Perhaps your sensors are not working properly (see below), whatever the case it’s a straight forward process that luckily doesn’t need to be done too often. Grab your gloves and let’s get to work!
Hopefully you’ve been using black tank treatments to keep odors at bay and to keep things running smoothly while you are on the road so this process should be nice and easy.
How to clean black water tank:
- Drain your black holding tank…
- Flush your tank…
- Quick bleach rinse…

There are several ways to flush your black holding tank:
There are inexpensive ($8 to $40) wands you can insert into your toilet that use water pressure from the hose to spray down the walls of your tank to remove gunk and debris. Motorhome tanks tend to be father from the toilet than camper trailers, you may want a flexible wand as these can be inserted even farther. Keep in mind these need to be stored somewhere and require a hose separate from your clean water hose.
Permanent tank rinsers can be installed directly into your tank. These don’t cost much either ($18 to $50) but do require a few holes to be drilled but is a relatively easy DIY. Leave the black tank valve open to avoid unwanted leaks in your bathroom should the pressure build up in your black water tank.
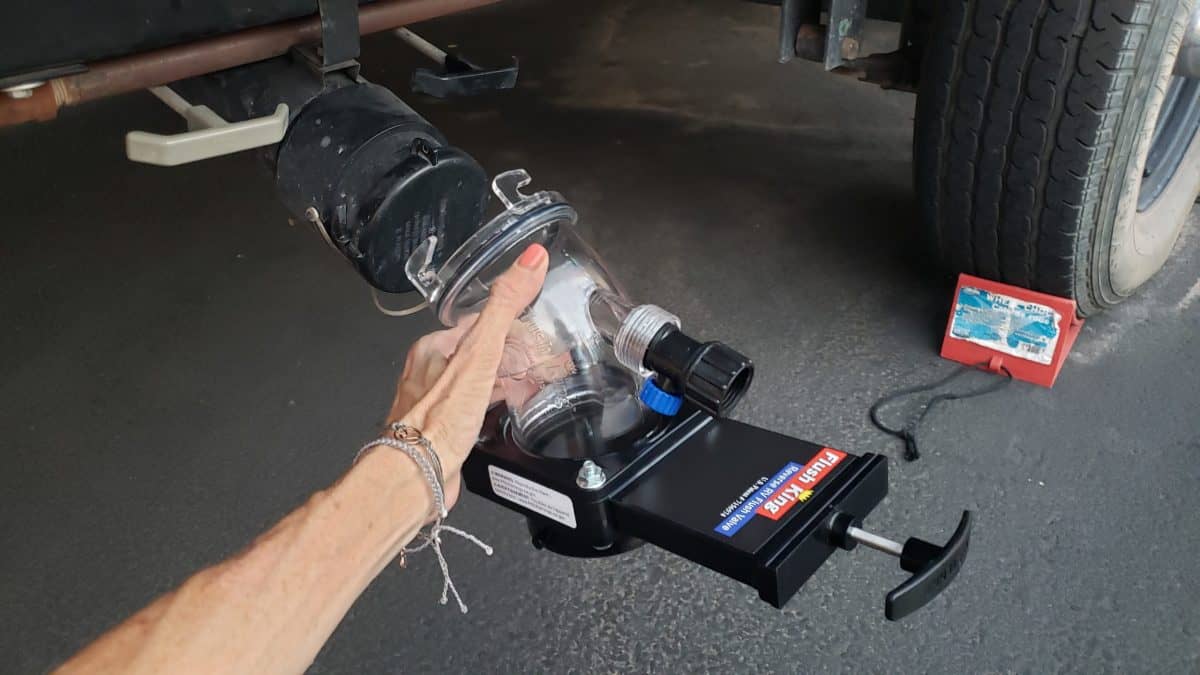
Reverse RV flush valves are clear elbows that hook up to the hose and blast a powerful steam of water back up into your black water tank to quickly and easily clear clogs and rinse sensors. It attaches to your outdoor black or grey tank drain. These cost from $25 to $100.
Don’t worry, the clear elbow allows you to see when the waste water runs clear and the solids move too fast for you to see any details of your RV enema. LOL
Reverse flush valves have 45 and 90 degree options available… which to choose? You want your sewer hose to have a direct shot to the sewer drain, so if your waste valve is located low to the ground, you’ll most likely want the 90 degree reverse flush valve. Likewise, if your holding tank connection is higher off the ground you’ll want the 45 degree elbow to allow your hose to drop to the drain. The 45 appears to be the most popular. (Pictured above)
Quick bleach rinse of the black tank
Do this step at the final dump station of your trip especially before storage. Perhaps you have a macerator allowing you to skip the dump station all together, you’ll still want to bleach your system before storing your RV.
Use a hose to partially fill your black tank. Pour about a cup of bleach into your toilet followed immediately with a few good flushes or a rinse with the hose. Wait 5 to 10 minutes and dump your tank.
If there is a line at the dump station, be courteous and loop back around to the back of the line as you have a few minutes to kill and the sloshing will help rinse the tank. Don’t stress out if the bleach stays in the tank longer than 10 minutes, just don’t leave it to sit over night like some folks do. Regularly letting the solution sit in your tank is where you run into problems down the road.
You’re good to go! That really wasn’t so hard was it? Your cute little RV appreciates you taking such good care of her!
Cleaning your gray water holding tank
Clean your grey tanks at the end of the season before storage, much like the black tank.
If you feel the need to sanitize your grey water holding tank with a quick bleach rinse as described above, by all means do so. Below I’ll outline how to dissolve soap scum.
How to clean the gray water tank:
On the drive to the final dump station, pour about a cup of dishwasher detergent into your tank along with some hot water. It works best to have a partially full tank.
Dish washer detergent is designed to dislodge and break down fat, soap scum, food particles and grease. Having this slosh around your tank for a few hours on the road helps to clean the sensors as well so you have a more accurate reading.

RV tank tips & tricks
- Keep black and gray valves closed until you are ready to dump even if you are hooked up. Seriously. You don’t want an open line from the sewer running up into your sweet little camper do you? You also don’t want gunk and solids to dry out and harden inside your tanks. Nasty!
- Speaking of solids in your tank, try not to dump nearly empty tanks as there may not be enough liquids to adequately drain and rinse your system. Wait until black and grey tanks are closer to half full before you dump them. You need the black tank to be able to “flow” and the gray tank and it’s soapy residue to rinse the black stuff out of your sewer hose!
- ALWAYS use separate hoses (clearly marked) for fresh drinking water and for rinsing your sewer drain. You use a separate brush to scrub veggies as you do to clean your toilet right? LOL Keep ’em separate.
- For easier storage, sewer hoses can be shorter as the faucet is located so close to the drain at dump stations. Fresh, potable (drinkable) water is sometimes farther from your tank so a longer hose is better. Collapsable/expandable hoses take up less space and are extremely light weight.
- After draining your tanks, hose off all the connections, gloves, sewer hose, hose ramp (if you used one) and the ground.
- A pump bottle of hand sanitizer is always a welcome sight nestled in with our sewer supplies. A bottle of hand soap is great too since the faucet is right there.
Look at that! Cleaning each one of your tanks is easily manageable and takes mere minutes. Hopefully you feel even more empowered to take your rig on your next journey. Cheers to you!
Do you have a tip or trick to share? We would love to hear it Mama! Tag me on Instagram and come join the party @mamas.little.camper. We talk about a lot more than waste tanks, promise! Ha ha. XO
Related Posts

How To Hook Water Up To An RV – Must Know
How to fill your fresh water tank, supplies and prices, where to get water and…
July 22, 2020